Saturday, August 3, 2019

What is in Microsoft Teams?

Learn the Microsoft Teams basics.
Desktop Client


Web client
The web client (https://teams.microsoft.com is a full, functional client that can be used from a variety of browsers. The web client supports Calling and Meetings by using webRTC, so there is no plug-in or download required to run Teams in a web browser. The browser must be configured to allow third-party cookies.

Mobile clients

The Microsoft Teams mobile apps are available for Android and iOS, and are geared for on-the-go users participating in chat-based conversations and allow peer-to-peer audio calls. For mobile apps, go to the relevant mobile stores Google Play and the Apple App Store. The Windows Phone App was retired July 20, 2018 and may no longer work.
Supported mobile platforms for Microsoft Teams mobile apps are the following:
  • Android: 4.4 or later
  • iOS: 10.0 or later
Next steps with Microsoft Teams

See what’s new in Office

Explore the new and improved features in Microsoft Teams and the other Office apps. Visit https://go.microsoft.com/fwlink/?linkid=871117 for more information.

Get free training, tutorials, and videos for Microsoft Teams

Ready to dig deeper into the capabilities that Microsoft Teams has to offer? Visit https://go.microsoft.com/fwlink/?linkid=2008318 to explore our free training options.

Microsoft team Video training

Get other Quick Start Guides

To download our free Quick Start Guides for your other favorite apps, go to
https://go.microsoft.com/fwlink/?linkid=2008317.


Get clients for Microsoft Teams

https://docs.microsoft.com/en-us/microsoftteams/get-clients


Configure Direct Routing


Enable Direct Routing with Microsoft Teams from an on-premises SIP Trunk, via a SBC. 

Configure a SIP Trunk directly from supported on-premises Session Border Controller (SBC) to Microsoft Teams via the internet.


What Do I Need?

The following diagram gives a good overview of all the requirements needed to enable Direct Routing:
For more details on planning and configuring direct routing, check out the following Microsoft Docs:


Network Requirements

In order to support direct routing, a single public IP address is required that must be presented to the SBC. In my example configuration below, I created a new dedicated one-to-one NAT on the perimeter firewall: 121.50.209.233 <> 192.168.1.187. The private address was then bound as an additional IP address to Ethernet 1:

FQDNs and Firewall Port Requirements

The connection point for Direct Routing are the following three FQDNs:
·         sip.pstnhub.microsoft.com – Global FQDN – must be tried first. When the SBC sends a request to resolve this name, the Microsoft Azure DNS servers return an IP address pointing to the primary Azure datacenter assigned to the SBC. The assignment is based on performance metrics of the datacenters and geographical proximity to the SBC. The IP address returned corresponds to the primary FQDN
·         sip2.pstnhub.microsoft.com – Secondary FQDN – geographically maps to the second priority region
·         sip3.pstnhub.microsoft.com – Tertiary FQDN – geographically maps to the third priority region
Placing these three FQDNs in order is required to:
·         Provide optimal experience (less loaded and closest to the SBC datacentre assigned by querying the first FQDN)
·         Provide failover when connection from an SBC is established to a datacentre that is experiencing a temporary issue
The FQDNs sip.pstnhub.microsoft.comsip2.pstnhub.microsoft.com and sip3.pstnhub.microsoft.com will be resolved to one of the following IP addresses:
·         52.114.148.0
·         52.114.132.46
·         52.114.75.24
·         52.114.76.76
·         52.114.7.24
·         52.114.14.70
Note: If your firewall supports DNS name resolution, the FQDN sip-all.pstnhub.microsoft.com resolves to all IP addresses listed above.
The following firewall ports are required to be open for all the above IP addresses:
Traffic
From
To
Source Port
Destination Port
Description
SIP/TLS
Teams SIP Proxy
(IP addresses above)
Ribbon SBC
1024-65535 TCP
Defined on SBC
SIP signalling from Teams to SBC. In example below, destination port selected for SIP signalling is 5061.
SIP/TLS
SBC
Teams SIP Proxy
(IP addresses above)
1024-65535 TCP
5061 TCP
SIP signalling from SBC to Teams.
UDP/SRTP
Teams Media Processor (ANY)
Ribbon SBC
49152-53247 UDP
Defined on SBC
Media from Teams to  SBC. The destination port is configurable on the SBC.
UDP/SRTP
SBC
Teams Media Processor (ANY)
Defined on SBC
49152-53247 UDP
Media from Ribbon SBC to Teams. The source port is configurable on the SBC.


DNS Requirements

Before moving onto the configuration steps below, make sure you have created a public DNS A record for your Direct Routing trunk FQDNs. In this example, I created an A record for teamstrunk.insynctechnology.com.au pointing at 121.50.209.233.

Step 1: Office 365 Tenant Direct Routing Configuration

·         Connect to Office 365 Remote PowerShell
·         $acctName="admin@domain.onmicrosoft.com"
·         $sfboSession = New-CsOnlineSession -UserName $acctName
·         Import-PSSession $sfboSession

New-CsOnlinePSTNGateway -Fqdn teamstrunk.insynctechnology.com.au -SipSignallingPort 5061 -MaxConcurrentSessions 10 -ForwardCallHistory $true -Enabled $true


·        create an empty PSTN Usage
Set-CsOnlinePstnUsage -Identity Global -Usage @{Add="Australia"}

Tuesday, March 5, 2019

Move Azure AD Connect database from SQL Server Express to SQL Server

This document describes to move the Azure AD Connect database from the local SQL Server Express server to a remote SQL Server.

About this scenario

Following is some brief information about this scenario. In this scenario, Azure AD Connect version (1.1.819.0) is installed on a single Windows Server 2016 domain controller. It is using the built-in SQL Server 2012 Express Edition for its database. The database will be moved to a SQL Server 2017 server.


Move the Azure AD Connect database

Use the following steps to move the Azure AD Connect database to a remote SQL Server.
1.      On the Azure AD Connect server, go to Services and stop the Microsoft Azure AD Sync service.
2.      Locate the %Program Files%\Microsoft Azure AD Sync/Data/ folder and copy the ADSync.mdfand ADSync_log.ldf files to the remote SQL Server.
3.      Restart the Microsoft Azure AD Sync service on the Azure AD Connect server.
4.      Un-install Azure AD Connect by going to Control Panel - - Programs - Programs and Features. Select Microsoft Azure AD Connect and click uninstall at the top.
5.      On the remote SQL server, open SQL Server Management Studio.
6.      On Databases, right-click and select Attach.
7. On the Attach Databases screen, click Add and navigate to the ADSync.mdf file. Click OK.

8.        Once the database is attached, go back to the Azure AD Connect server and install Azure AD Connect.
9.     Once the MSI installation completes, the Azure AD Connect wizard starts with the Express mode setup. Close the screen by clicking the Exit icon. 


10. Start a new command prompt or PowerShell session. Navigate to folder \program files\Microsoft Azure AD Connect. Run command .\AzureADConnect.exe /useexistingdatabase to start the Azure AD Connect wizard in “Use existing database” setup mode.
11. You are greeted with the Welcome to Azure AD Connect screen. Once you agree to the license terms and privacy notice, click Continue.


12. On the Install required components screen, the Use an existing SQL Server option is enabled. Specify the name of the SQL server that is hosting the ADSync database. If the SQL engine instance used to host the ADSync database is not the default instance on the SQL server, you must specify the SQL engine instance name. Further, if SQL browsing is not enabled, you must also specify the SQL engine instance port number. For example:


13. On the Connect to Azure AD screen, you must provide the credentials of a global admin of your Azure AD directory. The recommendation is to use an account in the default onmicrosoft.com domain. This account is only used to create a service account in Azure AD and is not used after the wizard has completed.


14. On the Connect your directories screen, the existing AD forest configured for directory synchronization is listed with a red cross icon beside it. To synchronize changes from an on-premises AD forest, an AD DS account is required. The Azure AD Connect wizard is unable to retrieve the credentials of the AD DS account stored in the ADSync database because the credentials are encrypted and can only be decrypted by the previous Azure AD Connect server. Click Change Credentials to specify the AD DS account for the AD forest.


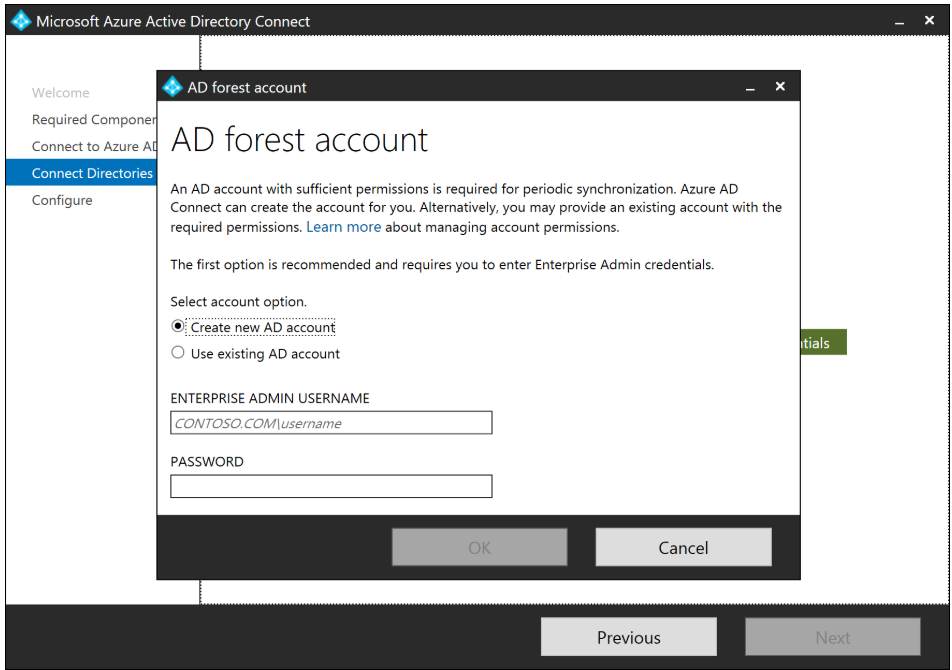
15. In the pop-up dialog, you can either (i) provide an Enterprise Admin credential and let Azure AD Connect create the AD DS account for you, or (ii) create the AD DS account yourself and provide its credential to Azure AD Connect. Once you have selected an option and provide the necessary credentials, click OK to close the pop-up dialog.


16. Once the credentials are provided, the red cross icon is replaced with a green tick icon. Click Next.


17. On the Ready to configure screen, click Install.


18. Once installation completes, the Azure AD Connect server is automatically enabled for Staging Mode. It is recommended that you review the server configuration and pending exports for unexpected changes before disabling Staging Mode

Friday, January 4, 2019

Exchange Multi-Forest Hybrid Tips and Tricks

Setting up Exchange hybrid between Office 365 and on-premises is a common and well-understood configuration.

Multiple forests, each with their own hybrid connection into a single Office 365 tenant, is supported from Exchange 2010 to 2019, although it does come with a unique set of challenges. This article assumes you have one Exchange organisation in hybrid and multiple Active Directory Domains synchronizing using Azure AD Connect already and are looking to add more Exchange Forests.

Office 365 tenant with two hybrid email forests

Key Considerations with Multi-Forest Exchange Hybrid

The basics still need to be in place for additional Exchange hybrid deployments. Azure Active Directory (AD) needs to successfully sync all users to the cloud (one per tenant, regardless of how many AD forests), Sender Policy Framework (SPF) and Domain-based Message Authentication. Reporting & Conformance (DMARC) also needs to be configured correctly, and the Simple Mail Transfer Protocol (SMTP), Embedded Web Server (EWS), and Autodiscover on-premises endpoints need to be exposed properly.

We should also take care to ensure that all Autodiscover endpoints work for all – internal name resolution allows connections through internal firewalls and if Service (SRV) records are in use then Outlook Autodiscover prompts are suppressed.

Hybrid Configuration Wizard
Setting subsequent Exchange organisations into Federation can be achieved by the normal Hybrid Configuration Wizard (HCW)

Centralised Mail Routing
Centralised mail routing is Microsoft’s term for sending outgoing emails via your on-prem environment. If this is present, or you wish your newly joined Exchange forest to perform centralised mail routing, then it’s necessary to take care to avoid unexpected mail routing. centralised mail routing and deliver email straight from Office 365 via the implicit deliver-via-MX-resolution route.

Don't enable centralised mail

Organization Configuration Transfer
In the Hybrid Configuration wizard, there is an option to perform an ‘Organization Configuration Transfer’ which copies certain configurations like retention policies tags.
Consider carefully before enabling organisation configuration transfer
Routing address
As part of the Hybrid Configuration wizard, your Exchange Address Policy generation default rule will be updated to include an Office365 routing address:

Use Email address from Company A in Company B
Once Exchange organisations are hybrid-enabled into the same tenant, it is possible for a user to have an email address based from another forest in the environment.