Thursday, November 22, 2018

Skype for Business Server 2019

  New features in Skype for Business Server 2019 include the following:
  Cloud Voicemail support enables all your Skype for Business 2019 users—whether they are homed on premises or online—to have access to Cloud Voicemail.

Cloud Call Data Connector greatly simplifies call monitoring in a hybrid environment by using online tools to monitor users call quality.

Streamlined Teams Migration allows administrators to easily move on-premises to Teams with a simple Admin experience.

TLS 1.2 support now enabled for improved security.

Added support for Windows Server 2019 and continued support for Windows Server 2016.

Features deprecated in Skype for Business Server 2019


The following features and functionality have been deprecated in Skype for Business Server 2019.

XMPP Gateways for Skype for Business Server

Skype for Business Server 2015 and its predecessors allowed you to configure an Extensible Messaging and Presence Protocol (XMPP) proxy on the Edge Server and an XMPP Gateway on the Front End Server or Front End pool. This functionality is no longer available in Skype for Business Server 2019.

Persistent Chat for Skype for Business Server

Persistent Chat Server is an optional role that lets multiple users in your organization participate in chat room conversations that persist over time. Persistent chat can't be deployed with Skype for Business Server 2019. This server role is removed from Topology Builder, as well as from the code.

SQL Mirroring for Skype for Business Server

SQL Mirroring can't be deployed with Skype for Business Server 2019. Other options for providing High Availability and Disaster Recovery are still supported and you should choose from among them.

In-place upgrades

In-place upgrades were available in Skype for Business Server 2015 but are no longer supported in Skype for Business Server 2019. Side by side upgrade and coexistance is supported, see Migration to Skype for BusinessServer 2019 for more information.

Mobility Service (Mcx)

Mobility Service support used by legacy mobile clients is no longer available in Skype for Business Server 2019. This was previously announced in Skype for Business Server 2015.
All current Skype for Business mobile clients already use Unified Communications Web API (UCWA) to support instant messaging (IM), presence, and contacts. Users with legacy clients using Mcx will need to upgrade to a current client.

Tools

The following tools will not be available for use at the initial release of Skype for Business Server 2019:
·        Skype for Business Server Capacity Planning Calculator
·        Skype for Business Server Debugging Tools
·        Skype for Business Server Resource Kit Tools (some tools will be removed)
o   Call Parkometer
o   Lookup user console
o   Unassigned number Announcement Migration
The following tools are not supported with Skype for Business Server 2019:
·        Call Quality Methodology (but not Call Quality Dashboard)
·        Microsoft Call Quality Methodology Scorecard, v1.5
·        Skype for Business Server 2015 Planning Tool
·        Skype for Business Server 2015 Stress and Performance Tool

Saturday, November 17, 2018

MICROSOFT EXCHANGE SERVER 2019


Microsoft Exchange Server 2019 has a long list of new enhanced features to improve the business user experience and security of the infrastructure. Some of the features that we all were waiting are here now with Exchange Server 2019 Like:
§  Support for Windows Server Core: Finally, It’s the time to plan and implement Exchange Server on Windows Server Core. Currently Exchange Server 2019 is only supported to deployed on Windows Server 2016 or 2019.
§  Performance Improvement: Exchange Server 2019 also support high end compute resource to better server your performance requirements. Exchange Server 2019 can support 48 CPO cores with 256 GB memory. It’s a huge improvement as compared to previous maximum server configuration support from 24 CPU cores and 192GB memory in Exchange 2013 and 2016 Server. Microsoft Exchange 2019 Server is now going to leverage Bing technology to provide fast and reliable search capabilities. This will be a very interesting feature from database fail-over perspective for enhanced performance and i’m looking forward to it. With Exchange Server 2019, index data will be stored inside the database instead of separate files located in the same folder as of database.
§  Calendar Improvements: Exchange Server 2019 is set to bring some of the cool calendaring features from Exchange online to on-premises that includes simplified calendar sharing, restricting the recipient ability to forward meeting invites etc.This feature would help the business users to restrict unwanted attendees to their meeting.
Want to know more? Check out this page on all Wave 2019 products. This year Ignite will be focused around Exchange Server 2019 launch from a messaging platform perspective. I’m looking forward to see all new upcoming features and announcements for Exchange Server 2019. From my perspective, Exchange Server 2019 release indicates Microsoft’s commitment towards on-premises version of the product to ensure they’re covering all type of business needs for a customer.

Thursday, November 15, 2018

Azure Active Directory Seamless Single Sign-On

What is Azure Active Directory Seamless Single Sign-On?

Azure Active Directory Seamless Single Sign-On (Azure AD Seamless SSO) automatically signs users in when they are on their corporate devices connected to your corporate network. When enabled, users don’t need to type in their passwords to sign in to Azure AD, and usually, even type in their usernames. This feature provides your users easy access to your cloud-based applications without needing any additional on-premises components.

Seamless SSO can be combined with either the Password Hash Synchronization or Pass-through Authenticationsign-in methods. Seamless SSO is not applicable to Active Directory Federation Services (ADFS).

Important
Seamless SSO needs the user's device to be domain-joined, but doesn't need for the device to be Azure AD Joined.

Deploy Seamless Single Sign-On


Azure Active Directory (Azure AD) Seamless Single Sign-On (Seamless SSO) automatically signs in users when they are on their corporate desktops that are connected to your corporate network. Seamless SSO provides your users with easy access to your cloud-based applications without needing any additional on-premises components. To deploy Seamless SSO, Follow the MSTechNet:

Read more on Microsoft docs:

Next steps

·        Quick Start - Get up and running Azure AD Seamless SSO.
·        Deployment Plan - Step-by-step deployment plan.
·        Technical Deep Dive - Understand how this feature works.
·        Frequently Asked Questions - Answers to frequently asked questions.
·        Troubleshoot - Learn how to resolve common issues with the feature.

Tuesday, November 13, 2018

Microsoft Teams Direct Routing


Office 365 can integrate with your existing directory services and with an on-premises installation of Exchange Server, Skype for Business Server 2015, or SharePoint Server 2013.

Direct Routing is a capability of Phone System in Office 365 to help customers connect their SIP trunks to Microsoft Teams. Session border controllers (SBCs) connect legacy systems and endpoints to Calling in Teams. Ribbon is one of only two vendors whose SBCs are certified to work with Direct Routing for Microsoft Teams. We offer a broad portfolio of solutions with session densities appropriate for small / branch offices to large carriers.

Direct Routing for Microsoft Teams!

Microsoft Phone System Direct Routing is now generally available. Direct Routing allows customers to choose their telecom provider to enable their users to make and receive calls in Teams. If your country is supported by Teams and Phone System you can start planning and deploying Direct Routing in your organization today. Direct Routing and Calling Plans are now your 2 choices for dial tone in Microsoft Teams.

Direct Routing is a Phone System add-on for Office 365 subscribers that lets organizations use their local phone service provider to make public switched telephone network (PSTN) phone calls. Phone System, formerly called "Cloud PBX," can be purchased separately, or it's offered as part of an Office 365 E5 subscription plan.

Organizations might opt to use Direct Routing if they want to stick with their phone service provider in enabling telephony and if they want manage the service on premises. Alternatively, Microsoft offers a Calling Plans Office 365 add-on option (formerly known as "PSTN Calling") in which Microsoft acts as the local phone service provider.

Direct Routing is a capability of Phone System in Office 365 to help customers connect their SIP trunks to Microsoft Teams. In the simplest deployment model, customers start with SIP trunks from their telecommunications provider. Next, customers will use and configure a supported Session Border Controller (SBC) from one of our certified partners. Microsoft's announcement listed two partners that offer certified SBCs for use with Direct Routing, namely AudioCodes and Ribbon. However, some of Microsoft's partners also offer so-called "hosted SBCs."

Direct Routing serves as a kind of telephony stepping stone for organizations using Microsoft Teams, which is Microsoft's workspace collaboration service. Microsoft Teams provides e-mail and chat for end users, but it also supports the ability to make phone calls through the client interface.
 Organizations also have the option to use Microsoft's Skype for Business unified communications solution to make phone calls, which can be used adjunctively with Microsoft Teams. However, Microsoft plans to replace the Skype for Business Online client with the Microsoft Teams client.
 It's clear that Microsoft wants to move its Office 365 customers over to using the Microsoft Teams client when making phone calls. Organizations now have the option to use Direct Routing or Calling Plans to add telephony to the Teams client if they want to move in that direction.

Coexistence with Existing Environment
https://www.audiocodes.com/solutions-products/products/products-for-microsoft-365/direct-routing-for-microsoft-teams


SBC to Microsoft Teams Direct Routing - Enterprise Model
https://www.audiocodes.com/media/13253/connecting-audiocodes-sbc-to-microsoft-teams-direct-routing-enterprise-model-configuration-note.pdf

SBC to Microsoft Teams Direct Routing - Hosting Model
https://www.audiocodes.com/media/13161/connecting-audiocodes-sbc-to-microsoft-teams-direct-routing-hosting-model-configuration-note.pdf

Plan Direct Routing
https://docs.microsoft.com/en-us/microsoftteams/direct-routing-plan

·        Infrastructure requirements
·        SBC domain names
·        Media traffic: port ranges
·        Supported SBCs

Configure a Session Border Controller for multiple tenants | Microsoft Docs


Office 365 integration with directory services

Office 365 can integrate with your existing directory services and with an on-premises installation of Exchange Server, Skype for Business Server 2015, or SharePoint Server 2013.

When integrate with directory services, we can synchronize and manage user accounts for both environments. We can also add password hash synchronization or single sign-on (SSO) so users can log on to both environments with their on-premises credentials. For more information about hybrid environments, see Office 365 hybrid cloud solutions overview.
Integrate Office 365 with directory services
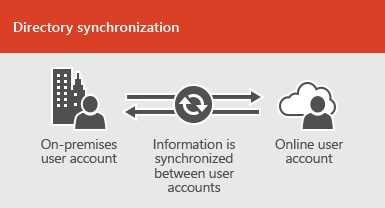
If you have existing user accounts in an on-premises directory, you don't want to re-create all of those accounts in Office 365 and risk introducing differences or errors between the environments. Directory synchronization helps you mirror those accounts between your online and on-premises environments. With directory synchronization, your users don't have to remember new information for each environment, and you don't have to create or update accounts twice. You will need to prepare your on-premises directory for directory synchronization, you can do this manually or use the IdFix tool (IdFix tool only works with Active Directory).
Use directory synchronization to keep on-premises and online user account information synchronized

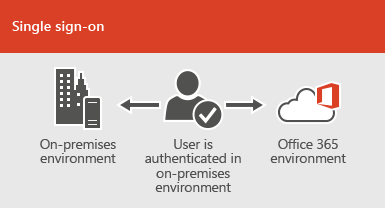
If you want users to be able to log on to Office 365 with their on-premises credentials, you can also configure SSO. With SSO, Office 365 is configured to trust the on-premises environment for user authentication.
With single sign-on, the same account is available in both the on-premises and online environments
Directory synchronization with or without password hash synchronization or pass-through authentication
A user logs on to their on-premises environment with their user account (domain\username). When they go to Office 365, they must log on again with their work or school account (user@domain.com). The user name is the same in both environments. When you add password hash sync or pass-through authentication, the user has the same password for both environments, but will have to provide those credentials again when logging on to Office 365. Directory synchronization with password hash sync is the most commonly used directory sync scenario.
To set up directory synchronization, use Azure Active Directory Connect. For instructions, read Set up directory synchronization for Office 365, and Use Azure AD Connect with express settings.
Directory synchronization with SSO
A user logs on to their on-premises environment with their user account. When they go to Office 365, they are either logged on automatically, or they log on using the same credentials they use for their on-premises environment (domain\username).
To set up SSO you also use Azure AD Connect. For instructions, read Use Azure AD Connect with custom settings.
Azure ADConnect
Azure AD Connect replaces older versions of identity integration tools such as DirSync and Azure AD Sync. For more information, see Integrating your on-premises identities with Azure Active Directory. If you want to update from Azure Active Directory Sync to Azure AD Connect, see the upgrade instructions. See a solution architecture built for Office 365 Directory Synchronization (DirSync) in Microsoft Azure.
 You can use the Azure AD advisors for customized setup guidance:
 

Migrate mails from Office 365 tenant to tenant

Migrate mails between two Office 365 tenants while keeping the same domain name  ie: move a domain from one tenant to another.

1. Mailbox migration

migrate your mailboxes from domain.com (tenant 1) to tenant2.onmicrosoft.com (tenant 2).
Choose a big bang migration:

2. Mail routing

provides a mail routing platform that forwards mails from domain.com (your domain) to tenant2.onmicrosoft.com
The transition will be transparent.
When you are ready to detach your domain, switch your MX records and point to domain.com mail routing platform.
Note: At the beginning of your migration, decrease the TTL of the MX record to the minimal value, so that there will be no caching issue when you will switch your MX records.
Every incoming mail for user@domain.com will be delivered transparently to user@tenant2.onmicrosoft.com
Therefore, even if it takes a few days to detach your domain, mail delivery will be performed transparently and the mails will be delivered to the target mailboxes even if the domain is not attached yet to the target tenant.

3. Domain detach

Activate the target tenant domain and to detach your domain from the source tenant.
You must first remove all the primary SMTP addresses and aliases that reference your domain company.com.

4. Rename users

Here is an example PowerShell script that modifies all mail addresses.

Get-MsolUser | ForEach { Set-MsolUserPrincipalName -ObjectId $_.ObjectId -NewUserPrincipalName ($_.UserPrincipalName.Split(“@”)[0] + “@sourcedomain.onmicrosoft.com”) }
  1. Set the Azure AD Logon UPN Domain to @domain.onmicrosoft.com
  2. Set the Default Mail Address for users to @domain.onmicrosoft.com
  3. Remove all alias Email Addresses
  4. Set Groups, Shared Mailboxes, and Resources primary SMTP Address to @domain.onmicrosoft.com
Once there are no more accounts that keep a reference to the source domain, Office 365 lets you detach the domain from the tenant ( Admin -> Office365 -> Domains -> Delete a domain )
the domain is being detached but cannot be reattached yet in the target tenant (because it still “belongs” to the source tenant).
Therefore, your users can start using the target mailboxes but they must use user@tenant2.onmicrosoft.com to login to the target.
If the transition is performed during a weekend, we recommend the users to login temporarily using OWA with the onmicrosoft.com UPN at the target (this will avoid a double Outlook reconfiguration).

5. Wait for the replication delay to expire.

Once the domain is free, you can reattach it to the target tenant.
In the Office 365 admin portal, go to Admin -> Office365 -> Domains -> Add a domain

6. DNS settings

Set the txt verification record.

7. Run The AAD connect to Sync the accounts to new target domain.

8. Reassign all your users their primary SMTP address.

Identity Management to set the primary SMTP address to their original value, Once all users have their UPN set to the .onmicrosoft.com domain, you will need to remove any email address using one of your domains. You will have to perform this cleanup on users, groups, and resources (room and equipment).
Set the Azure AD Logon UPN Domain to @tenant2.com
Set the Primary SMTP Addresses to @tenant2.com
Get-MsolUser -DomainName tenant2.com -all

9. Prepare Migration of Delta email Data

Source username@tenant1.onmicrosoft.com target username@tenant2.onmicrosoft.com


10. Change your MX records.

You can now point your MX records to the target Office 365 tenant

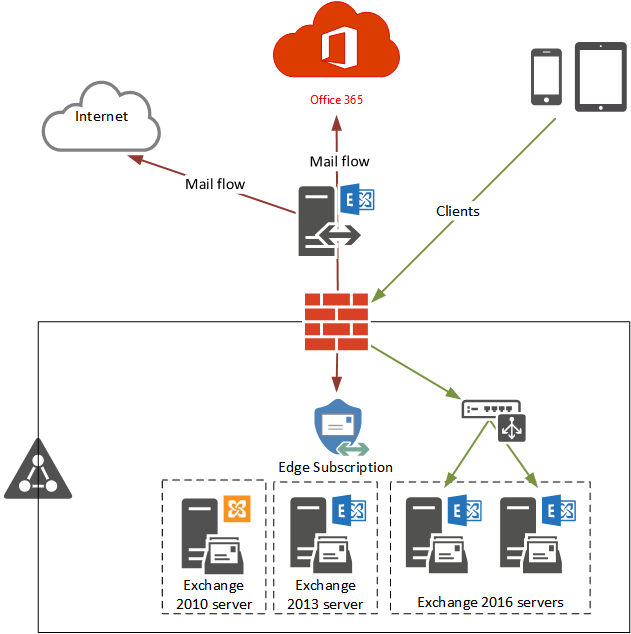
Upgrade Legacy Hybrid Exchange Server to Exchange 2016

Before to start Exchange 2016 deployment in existing exchange 2010 organization it’s important to understand the key architectural differences between Exchange 2010 and 2016.

Exchange2016 includes two server roles Mailbox and Edge Transport server roles. The Edge Transport server role needs to be installed on its own computer. It can’t be installed on the same computer as the Mailbox server role. The Edge Transport Server role in optional but Mailbox server role is mandatory.

Need to plan for following before exchange 2016 installation.
  • Active Directory Schema
  • Namespace for Exchange 2016
  • SSL Certificate
  • Hardware Sizing for Exchange 2016
  • High Availability of Exchange 2016
  • Mail flow
  • End user Impact
  • End user Communication
  • Exchange 2010 Health Check
 

Prepare for the Upgrade
The main thing you should do here is identify what you have now, what you are moving to, and where everything is going to live at the end of the day.
Azure Active Directory Connect: If you still have DirSync, you’ll need to upgrade it to Azure AD Connect. This tool can be downloaded from Microsoft and upgraded in-place, in many instances.
Exchange Server 2016: Before begin, it is a good practice to install the pre-requisites and run the schema extensions & Active Directory preparations. Also make sure you’re current on Windows Server patches, Exchange service packs, cumulative updates, etc.

Mailboxes and Public Folders: Provision some space and databases on the new server if you intend to keep an environment.

Step 1. Add Exchange Server 2016 to your environment

You need to install the entire mailbox role–there isn’t like a “lite” or hybrid-only option here. To obtain the installation packages, you can simply download the latest cumulative update package from Microsoft. Follow the TechNet guide to install exchange 2016 preparing for Exchange 2016 Server Installation

Once Exchange is installed, you can activate the server using a free hybrid license key (with qualifying Enterprise Office 365 plan). From the EAC, input the key by browsing to servers.


Step 2. Update the Service Connection Point (SCP)

Next step is, you will want to update the SCP to refer to whatever name is assigned on the old Exchange server. This is pretty quick and painless, but if you skip this step, clients on the LAN might throw a certificate warning. You can update this property using the Exchange Management Shell or EAC - Exchange2016 Post-Installation Configuration.

To view the SCP on the old server, type:
Get-ClientAccessServer -Identity OldServerName |fl

Look for the“AutoDiscoverServiceInternalURI” property here. For example, this might look like: https://autodiscover.domain.com/Autodiscover/Autodiscover.xml

Or it might be mail.company.com/Autodiscover…. Whatever you see as the output here, this is the value you need to apply on the new server. To do this, you can type:

Set-ClientAccessServer -Identity NewServerName -AutoDiscoverServiceInternalURI https://autodiscover.domain.com/Autodiscover/Autodiscover.xml

Step 3. Import the Exchange UCCcertificate (optional)

This part is simple, just export the certificate from the source server, and import it on the destination server. It is also optional, since certificates aren’t important if all of your mailboxes reside in the cloud, and there is no secure cross-premises mail flow requirement. You can find the certificate settings under servers > certificates


Step 4. Update Exchange Virtual Directories & Outlook Anywhere settings

Although you can manually go through and update each one of these through the GUI, This can be accomplished more quickly with PowerShell. Edit the values of $ServerName and $FQDN variables below to match what is appropriate in your own environment. $ServerName= “EXCH16
$FQDN = “mail.domain.com

Get-OWAVirtualDirectory -Server $ServerName | Set-OWAVirtualDirectory -InternalURL https://$($FQDN)/owa -ExternalURLhttps://$($FQDN)/owa”
Get-ECPVirtualDirectory -Server $ServerName | Set-ECPVirtualDirectory -InternalURL “https://$($FQDN)/ecp” -ExternalURL “https://$($FQDN)/ecp”
Get-OABVirtualDirectory-Server $ServerName | Set-OABVirtualDirectory -InternalURL “https://$($FQDN)/oab” -ExternalURL “https://$($FQDN)/oab”
Get-ActiveSyncVirtualDirectory -Server $ServerName | Set-ActiveSyncVirtualDirectory -InternalURLhttps://$($FQDN)/Microsoft-Server-ActiveSync -ExternalURL https://$($FQDN)/Microsoft-Server-ActiveSync”
Get-WebServicesVirtualDirectory-Server $ServerName | Set-WebServicesVirtualDirectory -InternalURL“https://$($FQDN)/EWS/Exchange.asmx” -ExternalURLhttps://$($FQDN)/EWS/Exchange.asmx-BasicAuthentication $true
Get-MapiVirtualDirectory -Server $ServerName | Set-MapiVirtualDirectory -InternalURL “https://$($FQDN)/mapi” -ExternalURL “https://$($FQDN)/mapi”
Get-OutlookAnywhere -Server $ServerName | Set-OutlookAnywhere -ExternalHostname $FQDN -InternalHostname $FQDN -ExternalClientsRequireSsl $true -InternalClientsRequireSsl $true -DefaultAuthenticationMethod NTLM

Step 5. Add anonymous SMTP relay connector (if applicable)

If you are using your local Exchange server as an SMTP relay for line of business applications or multifunction printers, then be sure to add a relay connector on the new server to take over this function. Here is an example of how to create a connector quickly in PowerShell that allows certain IP’s to anonymously relay from the local data subnet.

New-ReceiveConnector -Name “Allowed Anonymous Relay” -Usage Custom -TransportRole FrontEnd -PermissionGroups AnonymousUsers,ExchangeServers -AuthMechanism
Tls,ExternalAuthoritative -Bindings 10.0.0.21:25 -RemoteIPRanges 10.0.0.30-10.0.0.40,10.0.0.170,10.0.0.181

Note that the “Bindings” and “RemoteIPRanges” in the above example would need to be edited to match the values that are appropriate from your own environment. Once you have this added, you can reconfigure your devices and applications to start using the new server, instead of the old one.

Step 6. Update DNS and firewall rules, and update send connectors

At this time, you can update any local DNS entries for stuff like “mail.” or “autodiscover.”–the traffic on the local LAN segment will start to flow through the new Exchange server.  To make the same change for external users/services, you can just update your firewall NAT rules to point at the new server as well.
One last note, you will also want to update the send connectors by navigating to mail flow > send connectors.
Associate the connector to the new server by clicking edit (the pencil), then scoping. Find the source server settings, remove the source server and add the new server. For more details: Switch Mail Flow

Step 7. Migrate any remaining mailbox data (if applicable)

A quick method for finding and migrating any remaining mailbox data is to use PowerShell. Note that you should already have setup and configured your storage volumes and mailbox databases on the new server before doing this.

Get-Mailbox -Server OldServerName | New-MoveRequest
Get-Mailbox -Arbitration -Server OldServerName | New-MoveRequest

The above suggested cmdlets are probably over-simplified for larger, complex hybrid environments with a lot of on-premises mailboxes.

Step 8. Uninstall the Legacy Exchange Server

You can now remove the old 2010 server from the environment. Follow the best practice to decommission Exchange 2010.

Step 9. Run the new hybrid configuration wizard

Last, you can update your hybrid configuration from 2010 to 2016 by running the Hybrid Configuration Wizard. Since you already have a hybrid connection, it should detect this and allow you to upgrade it. You can find the wizard download by navigating to hybrid on the left menu in the Exchange Admin Center. Be sure that you are accessing the EAC using the true FQDN (e.g. https://mail.domain.com/ecp/?ExchClientVer=15)–just don’t use “localhost” or the internal server name–otherwise the wizard may fail.

Be prepared with your local and remote credentials to get through the wizard successfully.