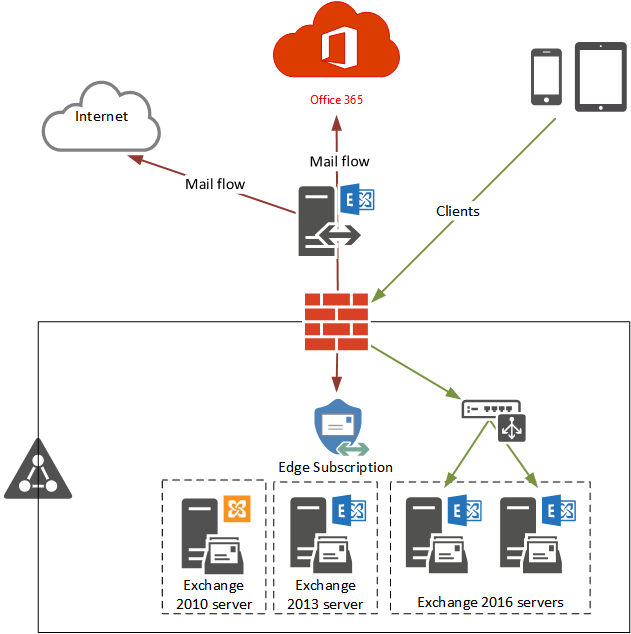
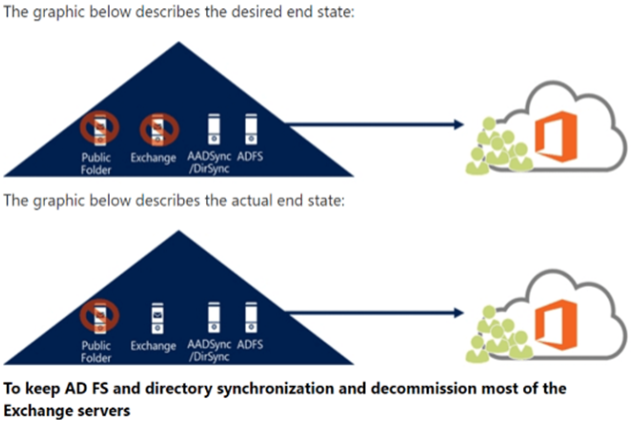
Before to start Exchange 2016 deployment in existing exchange 2010 organization it’s important to understand the key architectural differences between Exchange 2010 and 2016.
Need to plan for following before exchange 2016 installation.


Once Exchange is installed, you can activate the server using a free hybrid license key (with qualifying Enterprise Office 365 plan). From the EAC, input the key by browsing to servers.
Exchange2016 includes two server roles Mailbox and Edge Transport server roles. The Edge Transport server role needs to be installed on its own computer. It can’t be installed on the same computer as the Mailbox server role. The Edge Transport Server role in optional but Mailbox server role is mandatory.
- Active Directory Schema
- Namespace for Exchange 2016
- SSL Certificate
- Hardware Sizing for Exchange 2016
- High Availability of Exchange 2016
- Mail flow
- End user Impact
- End user Communication
- Exchange 2010 Health Check


Prepare for the Upgrade
The main thing you should do here is identify what you have now, what you are moving to, and where everything is going to live at the end of the day.
Azure Active Directory Connect: If you still have DirSync, you’ll need to upgrade it to Azure AD Connect. This tool can be downloaded from Microsoft and upgraded in-place, in many instances.
Exchange Server 2016: Before begin, it is a good practice to install the pre-requisites and run the schema extensions & Active Directory preparations. Also make sure you’re current on Windows Server patches, Exchange service packs, cumulative updates, etc.
Mailboxes and Public Folders: Provision some space and databases on the new server if you intend to keep an environment.
Step 1. Add Exchange Server 2016 to your environment
You need to install the entire mailbox role–there isn’t like a “lite” or hybrid-only option here. To obtain the installation packages, you can simply download the latest cumulative update package from Microsoft. Follow the TechNet guide to install exchange 2016 preparing for Exchange 2016 Server Installation
Step 2. Update the Service Connection Point (SCP)
Next step is, you will want to update the SCP to refer to whatever name is assigned on the old Exchange server. This is pretty quick and painless, but if you skip this step, clients on the LAN might throw a certificate warning. You can update this property using the Exchange Management Shell or EAC - Exchange2016 Post-Installation Configuration.
To view the SCP on the old server, type:
Get-ClientAccessServer -Identity OldServerName |fl
Look for the“AutoDiscoverServiceInternalURI” property here. For example, this might look like: https://autodiscover.domain.com/Autodiscover/Autodiscover.xml
Or it might be mail.company.com/Autodiscover…. Whatever you see as the output here, this is the value you need to apply on the new server. To do this, you can type:
Set-ClientAccessServer -Identity NewServerName -AutoDiscoverServiceInternalURI https://autodiscover.domain.com/Autodiscover/Autodiscover.xml
Step 3. Import the Exchange UCCcertificate (optional)
This part is simple, just export the certificate from the source server, and import it on the destination server. It is also optional, since certificates aren’t important if all of your mailboxes reside in the cloud, and there is no secure cross-premises mail flow requirement. You can find the certificate settings under servers > certificates.
Step 4. Update Exchange Virtual Directories & Outlook Anywhere settings
Although you can manually go through and update each one of these through the GUI, This can be accomplished more quickly with PowerShell. Edit the values of $ServerName and $FQDN variables below to match what is appropriate in your own environment. $ServerName= “EXCH16”
$FQDN = “mail.domain.com”
$FQDN = “mail.domain.com”
Get-OWAVirtualDirectory -Server $ServerName | Set-OWAVirtualDirectory -InternalURL https://$($FQDN)/owa -ExternalURL “https://$($FQDN)/owa”
Get-ECPVirtualDirectory -Server $ServerName | Set-ECPVirtualDirectory -InternalURL “https://$($FQDN)/ecp” -ExternalURL “https://$($FQDN)/ecp”
Get-OABVirtualDirectory-Server $ServerName | Set-OABVirtualDirectory -InternalURL “https://$($FQDN)/oab” -ExternalURL “https://$($FQDN)/oab”
Get-ActiveSyncVirtualDirectory -Server $ServerName | Set-ActiveSyncVirtualDirectory -InternalURLhttps://$($FQDN)/Microsoft-Server-ActiveSync -ExternalURL https://$($FQDN)/Microsoft-Server-ActiveSync”
Get-WebServicesVirtualDirectory-Server $ServerName | Set-WebServicesVirtualDirectory -InternalURL“https://$($FQDN)/EWS/Exchange.asmx” -ExternalURLhttps://$($FQDN)/EWS/Exchange.asmx-BasicAuthentication $true
Get-MapiVirtualDirectory -Server $ServerName | Set-MapiVirtualDirectory -InternalURL “https://$($FQDN)/mapi” -ExternalURL “https://$($FQDN)/mapi”
Get-OutlookAnywhere -Server $ServerName | Set-OutlookAnywhere -ExternalHostname $FQDN -InternalHostname $FQDN -ExternalClientsRequireSsl $true -InternalClientsRequireSsl $true -DefaultAuthenticationMethod NTLM
Step 5. Add anonymous SMTP relay connector (if applicable)
If you are using your local Exchange server as an SMTP relay for line of business applications or multifunction printers, then be sure to add a relay connector on the new server to take over this function. Here is an example of how to create a connector quickly in PowerShell that allows certain IP’s to anonymously relay from the local data subnet.
New-ReceiveConnector -Name “Allowed Anonymous Relay” -Usage Custom -TransportRole FrontEnd -PermissionGroups AnonymousUsers,ExchangeServers -AuthMechanism
Tls,ExternalAuthoritative -Bindings 10.0.0.21:25 -RemoteIPRanges 10.0.0.30-10.0.0.40,10.0.0.170,10.0.0.181
Tls,ExternalAuthoritative -Bindings 10.0.0.21:25 -RemoteIPRanges 10.0.0.30-10.0.0.40,10.0.0.170,10.0.0.181
Note that the “Bindings” and “RemoteIPRanges” in the above example would need to be edited to match the values that are appropriate from your own environment. Once you have this added, you can reconfigure your devices and applications to start using the new server, instead of the old one.
Step 6. Update DNS and firewall rules, and update send connectors
At this time, you can update any local DNS entries for stuff like “mail.” or “autodiscover.”–the traffic on the local LAN segment will start to flow through the new Exchange server. To make the same change for external users/services, you can just update your firewall NAT rules to point at the new server as well.
One last note, you will also want to update the send connectors by navigating to mail flow > send connectors.
Associate the connector to the new server by clicking edit (the pencil), then scoping. Find the source server settings, remove the source server and add the new server. For more details: Switch Mail Flow
Associate the connector to the new server by clicking edit (the pencil), then scoping. Find the source server settings, remove the source server and add the new server. For more details: Switch Mail Flow
Step 7. Migrate any remaining mailbox data (if applicable)
A quick method for finding and migrating any remaining mailbox data is to use PowerShell. Note that you should already have setup and configured your storage volumes and mailbox databases on the new server before doing this.
Get-Mailbox -Server OldServerName | New-MoveRequest
Get-Mailbox -Arbitration -Server OldServerName | New-MoveRequest
Get-Mailbox -Arbitration -Server OldServerName | New-MoveRequest
The above suggested cmdlets are probably over-simplified for larger, complex hybrid environments with a lot of on-premises mailboxes.
Step 8. Uninstall the Legacy Exchange Server
You can now remove the old 2010 server from the environment. Follow the best practice to decommission Exchange 2010.
Step 9. Run the new hybrid configuration wizard
Last, you can update your hybrid configuration from 2010 to 2016 by running the Hybrid Configuration Wizard. Since you already have a hybrid connection, it should detect this and allow you to upgrade it. You can find the wizard download by navigating to hybrid on the left menu in the Exchange Admin Center. Be sure that you are accessing the EAC using the true FQDN (e.g. https://mail.domain.com/ecp/?ExchClientVer=15)–just don’t use “localhost” or the internal server name–otherwise the wizard may fail.


Hi,
ReplyDeleteWhen we run HCW will create the current send connectors in Exchange 2010 in 2016?
Do we really need the SSL certificate to run HCW?
TA
thank you for your interesting infomation. שרת וירטואלי
ReplyDeleteThis article gives the light in which we can observe the reality. This is very nice one and gives indepth information. Thanks for this nice article. raklapos szállítmányozás Europa-Road Kft
ReplyDeleteWonderful article. Fascinating to read. I love to read such an excellent article. Thanks! It has made my task more and extra easy. Keep rocking. EHR Legacy Data Archiving System
ReplyDeleteNew Exchange server are giving latest features and functionalities and also give more security. If you are planning to migrate your Exchange 2016 to 2019 or Exchange 2010 to 2016 and many more, EdbMails Exchange migration is one of the best Exchange migration solutions that meet all your Exchange migration requirements.
ReplyDeleteKnow More: Exchange Migration