Office 365 can integrate with your existing
directory services and with an on-premises installation of Exchange Server,
Skype for Business Server 2015, or SharePoint Server 2013.
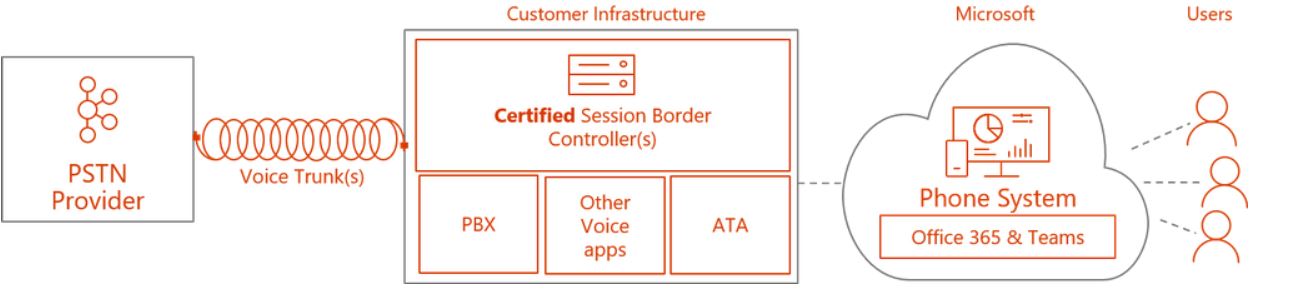
Direct Routing is a capability of Phone System in
Office 365 to help customers connect their SIP trunks to Microsoft Teams.
Session border controllers (SBCs) connect legacy systems and endpoints to
Calling in Teams. Ribbon is one of only two vendors whose SBCs are certified to
work with Direct Routing for Microsoft Teams. We offer a broad portfolio of
solutions with session densities appropriate for small / branch offices to
large carriers.
Direct Routing for Microsoft Teams!

Microsoft Phone System Direct Routing is now generally available. Direct Routing allows
customers to choose their telecom provider to enable their users to make and
receive calls in Teams. If your country is supported by Teams and Phone System
you can start planning and deploying Direct Routing in your organization today.
Direct Routing and Calling Plans are now your 2 choices for dial tone in
Microsoft Teams.
Direct Routing is a Phone System add-on for
Office 365 subscribers that lets organizations use their local phone service
provider to make public switched telephone network (PSTN) phone calls. Phone
System, formerly called "Cloud PBX," can be purchased separately, or
it's offered as part of an Office 365 E5 subscription plan.
Organizations might opt to use Direct Routing if
they want to stick with their phone service provider in enabling telephony and
if they want manage the service on premises. Alternatively, Microsoft offers a
Calling Plans Office 365 add-on option (formerly known as "PSTN
Calling") in which Microsoft acts as the local phone service provider.

Direct Routing is a capability of Phone System in Office 365 to help customers connect their SIP trunks to Microsoft Teams. In the simplest deployment model, customers start with SIP trunks from their telecommunications provider. Next, customers will use and configure a supported Session Border Controller (SBC) from one of our certified partners. Microsoft's announcement listed two partners that offer certified SBCs for use with Direct Routing, namely AudioCodes and Ribbon. However, some of Microsoft's partners also offer so-called "hosted SBCs."

Organizations also have the option to use
Microsoft's Skype for Business unified communications solution to make phone
calls, which can be used adjunctively with Microsoft Teams. However, Microsoft
plans to replace the Skype for Business Online client with the Microsoft Teams
client.
It's clear that Microsoft wants to move its
Office 365 customers over to using the Microsoft Teams client when making phone
calls. Organizations now have the option to use Direct Routing or Calling Plans
to add telephony to the Teams client if they want to move in that direction.
Coexistence with
Existing Environment
https://www.audiocodes.com/solutions-products/products/products-for-microsoft-365/direct-routing-for-microsoft-teams
SBC to Microsoft Teams Direct Routing - Enterprise Model
https://www.audiocodes.com/media/13253/connecting-audiocodes-sbc-to-microsoft-teams-direct-routing-enterprise-model-configuration-note.pdf
SBC to Microsoft
Teams Direct Routing - Hosting Model
https://www.audiocodes.com/media/13161/connecting-audiocodes-sbc-to-microsoft-teams-direct-routing-hosting-model-configuration-note.pdf
Plan Direct
Routing
https://docs.microsoft.com/en-us/microsoftteams/direct-routing-plan


